The easiest HTTPS-Dashboard that every home lab should have

You can deploy any kind of tool in your smart home lab, but if you work on it during holidays, nights, post work hours, for sure, you will forget every time the way you choose to access to your services (ip, port, name…).
Is there an easy way to handle, collect and secure these services in just few minutes?
1 The target
After few minutes you will have a custom dashboard for all your homelab apps, secured with a rock-stable reverse proxy and a simple way to use secure HTTPS connections for all your services. And… it’s completely free!
2 Prerequisites
- A local server, just like an old pc, a blade server or an Intel Nuc, that you can use on your local subnet H24.
NoteI assume that you will use an x86 or amd64 architecture on Linux-based OS, but if you have an ARM (Raspberry…) or a Windows OS you can easily adapt the following steps to reach the target.
- Port 80 and 443 must be free on the server and the local ip of the server should be static.
- Ip connection to internet (static or dynamic ip). Expose though port-forwarding the tcp ports 80 and 443 of the home lab server.
- docker and docker-compose installed on your home lab server. A good set of documentation is available directly on docker web pages.
- A dynamic DNS name (just like NoIP or dyn.com ones) or a static dns name in case you have a connection with a static ip. Remember to allow all subdomains with a wildcard “*.”. Replace “YourPersonalHomeLabSite.dyndns.org” with your own DNS name.
- Optionally - you can work through ssh, directly on the server or using a kvm, but I suggest you to use Visual Studio Code with Docker extension or Remote Development plugin, it’s insanely efficient!
3 What is a reverse proxy and why we need it?
The Nginx Proxy Manager is composed by a reverse Nginx proxy and a web gui management console, that helps you to setup the proxy. The reverse proxy is, approximately, a web server where each page or content is retrieved from other servers. When I ask something to my reverse proxy he doesn’t have the content I want, and he synchronously ask for that content to other “host”.
4 Let’s Go -> Turn on the containers
On your home lab server choose a path and make a directory for your proxy-dashboard environment. I usually create /opt/homelab or /homelab, so the proxy-dashboard folder will be, in my case, /opt/homelab/proxy_dashboard.
Create /opt/homelab/proxy_dashboard/docker-compose.yaml inside the new folder:
|
|
Create folders for your volumes, using the same paths of the docker-compose file:
- /opt/homelab/proxy_dashboard/nginxproxymanager
- /opt/homelab/proxy_dashboard/dashmachine
- /opt/homelab/proxy_dashboard/dns
You are ready to turn on your containers, launch on a terminal of the server:
|
|
5 Setup of the Nginx Reverse Proxy
From a pc on the LAN navigate to nginx proxy manager UI page: http://IP_OF_THE_HOMELAB_SERVER:81
The GUI will ask you to access and then to change the administrator password, default credentials are:
- Email: admin@example.com
- Password: changeme
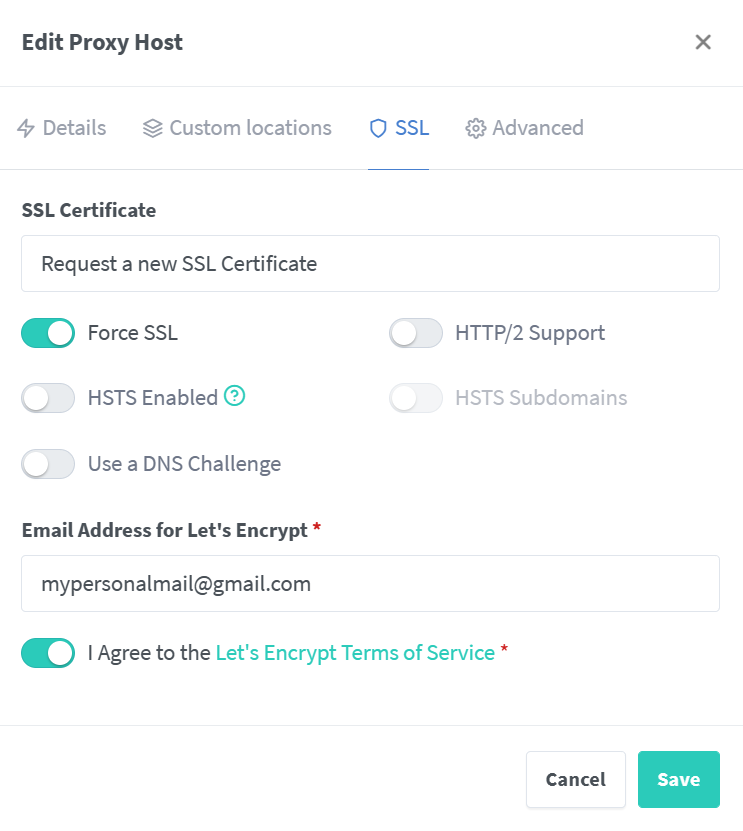
Save, wait and BOOM, you can browse to https://YourPersonalHomeLabSite.dyndns.org to access your dashboard, from your lan and from internet.
6 Setup your dashboard
|
|
- background = https://picsum.photos/1920/1080?blur=5 -> in this way you will have a new random background at each access, wonderful.
- Replace “YouMustChooseAGoodPassword” with adequate passwords, these credentials will secure the configuration file of the dashboard that is exposed to internet.
- One of the bookmark is the Nginx Proxy Manager ui, you can use as the url= nginxproxymanager.YourPersonalHomeLabSite.dyndns.org (you have to properly add the host to proxy manager) or directly with url= IP_OF_THE_HOMELAB_SERVER:81 (prefix = http://)
- Other bookmarks could be internal services already exposed through your brand new reverse proxy, just like home assistant and openhab, or external links just like unifi.ui.com.
- You have to manually load icons with the “Drag & Drop - choose” in the image card. You have to properly match names with the links!
7 Setup local DNS
To use access lists with sender ip we have to handle local requests directly from the lan. If you are sending a request from internet, a dns server will point you to public ip of your router. But you are inside the lan, you have to directly point the reverse proxy, otherwise your request could go to your gateway and then comes back with an “external sender ip”. You have to setup a mini internal dns server. Just create a file /opt/homelab/proxy_dashboard/dns/dnsmasq.conf:
|
|
Now you must use the IP_OF_THE_HOMELAB_SERVER as primary DNS of the devices (or configure it from your dhcp server - router).
8 Add other hosts to your reverse proxy
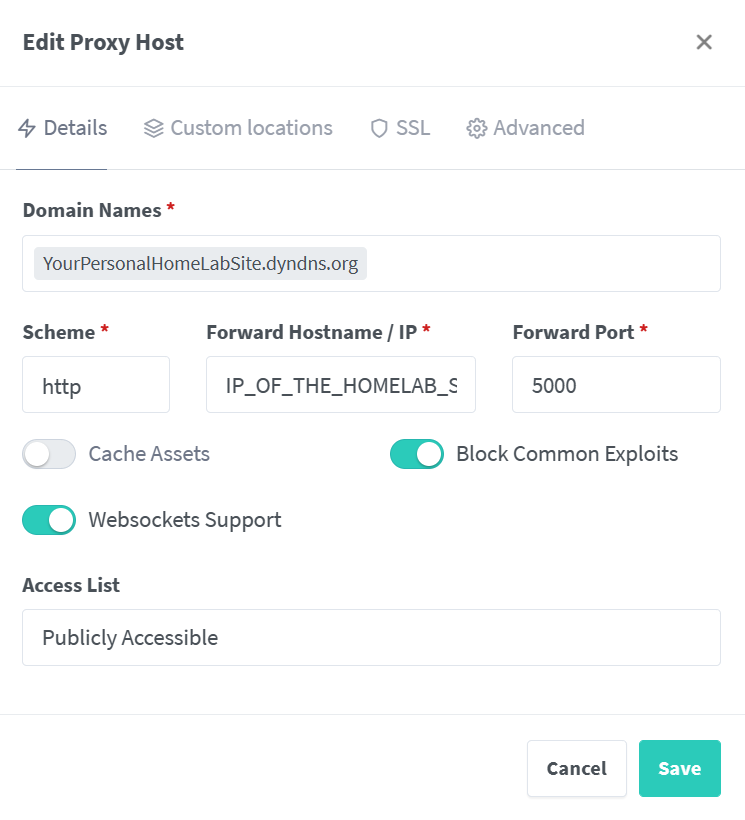
Now you will configure each service on your network that you want to handle with the reverse proxy, in order to adding https support and a easy subdomain name (just like mysubdomain.YourPersonalHomeLabSite.dyndns.org).
We can start with Nginx proxy manager gui, but before we have to create an access list to restrict the accessibility of some hosts at the host in the LAN (for security purposes).
Come back to http://IP_OF_THE_HOMELAB_SERVER:81, then go to Access list -> Add Access List.
We can call it “LAN” and flag only “Satisfy Any”. On the Access tab compile:

Ok, now create a new host from Hosts tab: 
Good, if you have other services in the same server or in other devices you can setup the routes in the same way, for example:

9 Do you want more?
On Nginx Proxy Manager GUI you can create an access list that allow normal access from the LAN or username-password authentication from WAN. You have to create an asccess list just like before, flag “satisfy any” and add some usernames and passwords in the second tab.
10 Alerts
Basically, you are exposing the reverse proxy and all the hosts to internet, and this could be risky for your privacy and cybersecurity if you don’t handle it properly.
If you navigate from internet to your public ip you will get an http error page, because of reverse proxy will not respond to public ip requests. The proxy will respond just for urls listed on “hosts” tab of the proxy manager gui. If you just want to have https on your services, you can set all the “access list” options of the hosts (expect for the main host) to LAN.
Another thing… Google Chrome and Google-devices are using internal DNS instead of system dns. This can create some troubles to your new internal dns server. If you have a firewall you can block dns requests to google dns ip, or from the advanced settings of chrome you have to toggle off “use secure dns”. If the problem still persists, you have to disable the flag #use-dns-https-svcb-alpn in edge://flags/ and chrome://flags/. For more details click here
11 Need help?
If something doesn’t work as it should do, calm down, you’ve just found another way that won’t work. Please, double check for the prerequisites and make sure you have a clean environment to start with the right foot. Still have problems? leave a comment and me or someone could help you.